Orton Effect **Updated**

The Orton effect is a photographic technique developed by Micheal Orton. Basically he took two pictures one out of focus and over exposed and one in focus and exposed correctly and then using slides placed them ontop of each other to get a wonderful dreamy effect.
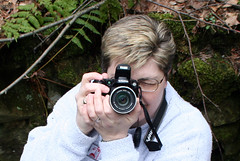
As you can see from my before and after pictures it really makes a huge difference on the impact of the photograph. I have always loved this picture and now I love it even more.
The fact that we now have digital photography to make everything easier only makes this a 10 minute project!
You can use a single photograph for this tutorial. You'll need a program such as photoshop or photoshop elements, something that uses layers. As I have said before you can get a trial version of both elements and photoshop from there site HERE.
Thanks to one of my readers we have a much easier to follow tutorial with illustrations! For beginners go HERE This page is done by Chris Empey
And if you want to torture yourself a bit try my step by step. :)
Heres the steps I did.
1. Open up your picture
2. create 2 duplicates of the background image by right clicking on the layer and selecting duplicate.
3. Name one of the new layers "sharp" by double clicking on the layer until the words are highlighted.
4. Name the other duplicate "sharp copy" .
5. with the "sharp copy" layer highlighted change the "blending mode" to "screen". It's a little drop down menu right above the layers.
6. Now right click on the image "sharp copy" and select "merge down"
7. Now duplicate the "sharp" layer and rename it "out of focus"
8. On the Filter Menu, choose Blur - Gaussian Blur I chose 15.5 for mine. but you can pick what works for your image. remember your going to merge this later so you want it out of focus.
9. With the "out of focus layer" selected changing the "blending mode" to "multiply"
10. You can adjust the opacity of the "out of focus" layer if you want to for your image.
Basically thats it I suggest saving both in jpg and psd so you can go back to it latter if you want and make more adjustments.
Just to recap you are going to make a total of three duplicates. One "sharp", One "Sharp copy" and one "out of focus"
Any questions let me know and I'll try to help.
![]()


2 comments:
Hello,
You can view a complete tutorial including screen shots for this technique which I wrote in October of last year at http://potd.chrisempey.com/tips/archives/2006/10/the_orton_effec.php
Chris
http://potd.chrisempey.com/tips
Wow yours is much easier to follow. If you don't mind I will post in your link with my article. Thanks!
Post a Comment