Tuesday, February 27, 2007

My Latest Photographic Adventure

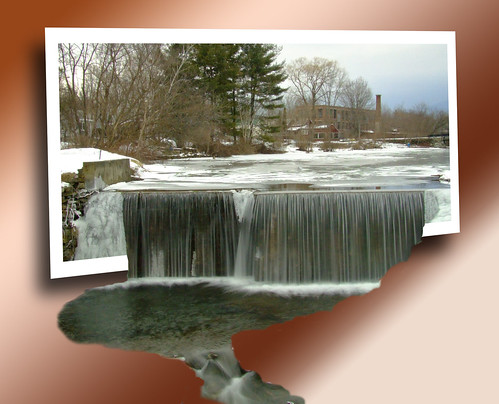
I went down to Pownal Vermont, thats about 10 minutes from here and I was hoping to get some nice snow shots. So I went down by the river, no I don't know the name, anyway the old Tannery Mill used to be there, it was a superfund site for as many years as I have been here. Thats 22 years for those that are counting. I went to drive over an old bridge so I could get a picture of the old unused one next to it. Now I have been over this bridge oh maybe 10 or more times, and never once did I notice this HUGE waterfall sitting about 200 yards up stream. But there it was.
Shows you how much I paid attention before I got this camera! LOL


Although the snow was 22" deep in some spots the iced over snow made it a bit easier to trek through. The old mill is gone now, and there is a memorial plaque noting the site. There was a once famous picture of a young child who used to work there at the turn of the century.
This is a big waterfall with lots of minerals in the water to give it that nice blueish green color, at least I hope it's minerals and not chemicals! LOL

I never did get the picture of the bridge, maybe next time.

Top 500 Photographs on the Internet

These pictures are stunning, captivating and you will be awe struck. These are a MUST see, for any enthusiast or not. Top 500 Photographs

Monday, February 26, 2007

A Splash of Color


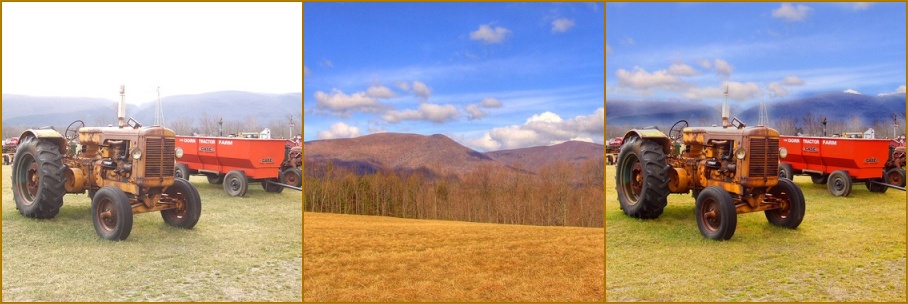
Before & After

I found this quick tutorial that will really make any photograph POP. Basically you desaturated the photo (removes all the color) and then use the history brush to add the color of specific areas back in. Heres the Tutorial

Sunday, February 25, 2007

Understanding f-Stops

This is such a great article that every newbie should read. I am not a newbie and I read it and it really does explain the mysterious world of f-stops. They have pictures and everything so go check it out, I promise you will learn something!
Stops & Exposures A Beginners Guide
And while your there cruise around to some of the other articles posted on Photohead.com you wont be sorry.

New Photo Contest

Heres a new photo contest I found.
Cape Cod Weather vane Company Photo Contest I wont be entering but I hope some of you do. $300.00 is the top prize. Check it out!
Good Luck!

How to make a Macro Light Box


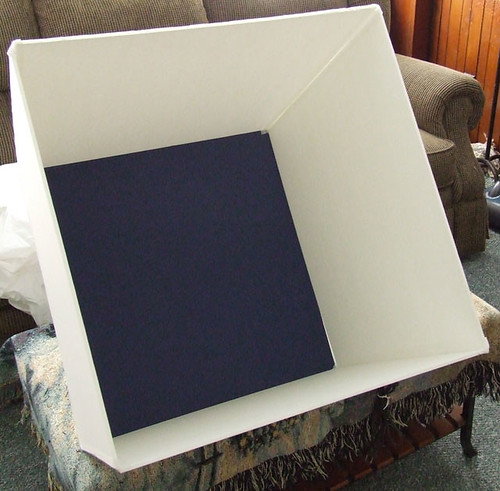
Well I am sure most of you have seen something similar to this. There is nothing difficult about it. All I did was buy 4 white foam boards at the dollar store and one foam board that had a blue back on one side and white on the other. I cut it down to a more reasonable size. Any size you choose is fine, and if you want I suppose you don't need to cut it at all depending on what you want to take a picture of.
Then I used white cloth tape, this is important as you don't want to use masking tape as the color is different, and it would show up in your picture. Tape the sides together and then tape your back on to the square. I chose to have a colored background, but I can change that by using a piece of white poster board to insert when necessary.

I found that because I have 7 cats keeping it fur free will be difficult, fortunately I have an old bicycle gift wrap bag laying around not doing anything. And if it does get dirty I can just use a lint roller to remove anything.

Now all I need is some lights to clamp on the sides for indirect lighting. Once I have those I be able to post some pictures. I tried doing some today but without the indirect lighting they came out pretty badly.

I am also going to cut a whole at the top and make it a flap so I can take top view pictures. This will make it a lot easier and give some better angles.

Now there are some tutorials where you use an existing box cut out the sides and tape poster board on it and then shine the light from the outside of the box for indirect lighting. But I chose this method as I thought it would give me better control of the shadows. And I can position it better for more depth and texture.

Let me know how this works if you try it, I would love to see some shots.

Saturday, February 24, 2007

Tips on Starting a Succesful Photography Business


As with most advanced hobbyist I have thought of becoming a professional photographer. As a matter of fact I have always wanted to become a photographer. But until recently only thought of it as a hobby and not as a profession.
My professional career has been a very diverse one, ranging from caregiver to office manager to business owner and back again.
Through out that time I have "tinkered" with photography and have always learned just enough to get by. Always wanting to learn more but never having the time, or the physical capability to get out and take the photographs I have wanted.
Until last year I had not really done much with this artistic side. I painted, and designed and photographed landscapes. But then I was fortunate and found Flickr then it took off from there. The learning and craving for more information lead me to start selling my photographs at Cafepress.
Well I can't say I have made a fortune on it. All tolled I think I have sold $18.95 in profits. Doesn't sound like much I know but consider I haven't really advertised since I started. Well I can't say that is not true either, I don't pay for advertising.
I have my Blog's (Waterfalls of Vermont) and I have Flickr and I also sell stock photography on Fotilia.
So where is all this going, well I wanted to tell you guys about an article I read on how to start your on photography business. Most of the tips are basic common sense and then there are some that really are good things to know if you are headed in that direction.
30 Tips for a Successful Photography Business
So if any of you are interested in becoming professionals read the article and by all means drop me a line I would love to know how you are doing.

Why camera's add 10lbs?

This is a very interesting read. Why camera's add 10lbs?
As most of you will read it's all about lighting. This is a prime example of why lighting is so important in any type of photography but especially in portraits. Although I confess to never have tried portraits I am planning on taking some of my Wife Deb and one of our many Cats "Skippy". So I have been reading up on portrait photography.
I want this picture to be special as "Skippy" has CRF basically his kidney's are failing him and Deb & he are so very close.

Anyway I also wanted to point out how difficult shooting pictures in the winter are as lighting is difficult.
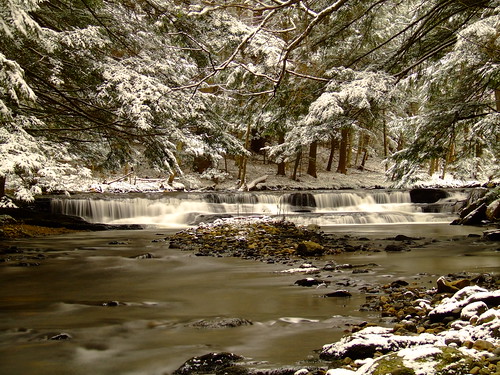
The first picture here was taken the night of the blizzard.


As you can see the lighting is relatively good, I opened the shutter to bring in more light. I'll tell you using the light meter built into the camera really helps. All I did was make sure the meter was in the middle by adjusting the aperture and shutter.

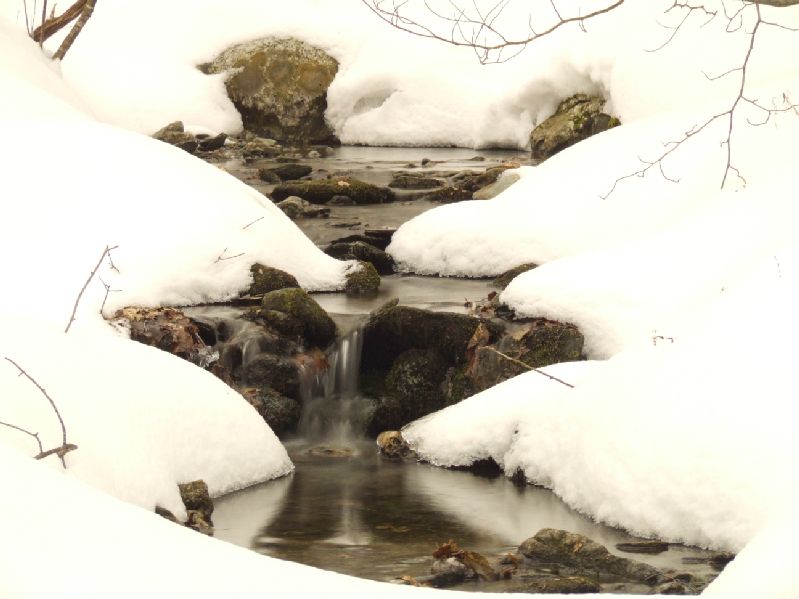
Now this next picture I took on a shady day. I set my white balance for shade and then I had to add all 3 of my ND filters plus my CP filter. I opened the shutter for some movement and I got this picture. Although you can see some "tinging" of pink on some of the snow, I think that is from the polarizer. I didn't bother with adjusting the photo in photoshop to show the effect.

Even with the shutter speed closed a bit without the nd filters it was so washed out you couldn't see much of the water.

As the article explains there has to be some contrast to better view the different objects in it. But in snow all rules are thrown out the window and you just have to play with the settings I find until you get the effect you want.

Wednesday, February 21, 2007

My Newest Adventure!


So I went to take pictures this morning. I went to this beautiful spot near one of the waterfalls I have taken pictures of. I climbed down the bank very slowly in 20" of snow, I made it all the way down there set my camera up and got 2 pictures, just after taking the second photo, the one above, I moved one foot forward to get a better position, and then I fell right through the ice! The cold freezing water rushing into my shoes, my toes were instantly cold! I was in up to my thighs and fell backwards to protect my camera, of course, and landed on my butt!
I realized I was in trouble when I couldn't pull myself out. I had laid my back pack full of all of my camera equipment behind me so I was able to turn and put my camera and tripod away, close it up and strap it on.
You know 20" of snow is not easy to crawl out of. I tried turning around but I wasn't able to get my footing right off. Stupid me didn't think I would need to wear boots today, so I just had on my sneakers, brrrrrrrrrrrrrr....
I was going to call for help as Deb was waiting in the truck for me, but I was pretty sure she wouldn't hear me from where I was so I started to climb up as my pants got snow frozen to them. I got half way up when Deb came looking for me, thank god, she went and got the truck and help me up into the nice warm cab.
Yes there is a moral to this story, when you fall into the snowy river fall backwards to protect your camera! LOL

Monday, February 19, 2007

How Camera Lens' Are Made Video!


This is a must see video for any camera enthusiast. I never knew how complicated it was to make a lens! Enjoy!

Sunday, February 18, 2007

Cool Stabilising Camera Bag!

All I can say is COOL! What a great idea! I wish I had thought of it. Imagine not having to carry a tripod where ever you went. It is made in the UK and it sells for £24.99 (thats $48.74 US) Not including shipping.
You can find more about it at The Dog House.

Saturday, February 17, 2007

Batch Processing Watermarks for Your Photographs

Ok I have found the quick easiest way to watermark multiple photos at the same time. If you remember last week I told you about a site Oman3D, the site offers tons of free tutorial videos on everything from flash to photoshop and more. Well I was watching one of there videos on batch processing photos. And it show how in about 5 minutes you can make a watermark and apply it to as many photos as you want whenever you want. I plan on doing this with all of my photographs from now on. Copyrighting is a great thing to do for your work but it doesn't prevent people from brushing out the copyright and using it. A watermark really is the only answer to insure your photographs are protected. I'll update this post tomorrow with my results.

Just some house keeping

As you can see I have been doing some house keeping. I took away a few things and added a few others. I hope it makes your visit a bit easier. I especially like the email subscription tool. I took out the email to friends, it any does use it let me know and I will put it back. Please be patient as I am still playing around with it today.
Flickr seems to be having some very strange issues with my pictures and at one point my picture was a "Paypal" icon. So if the pictures seem odd give it time as I know flickr is working on it.

Wednesday, February 14, 2007

How to Win 1st Place in a Photography Contest

Perseverance, Perseverance, Perseverance, Perseverance. I have often, as many of you are aware of, enter photography contest. And like most I don't win. I have gotten so used to not winning that I don't even bother to check to see who did win!
So today on valentines day and during a huge blizzard, and in the process of unpacking, I took the time to check my email. And there it was yet another email from Shutterfly, but this time there were two emails. One asking to check out the winners and the other one saying "Congratulations"!

I was on the phone trying to get a new manual for a clock radio since we lost ours. I read it as I was talking and couldn't believe my eyes. Once off the phone I yelled "WoooHooo!!!", scaring all the cats and causing Deb to come running! "I won, 1st prize!"

Here is the winning photo

Snow Falls


The contest was "Winter Wonderland Photo Contest"

I Won a $50.00 gift Certificate and a 12 x 12 memory book arv $55.

So the moral to this story don't give up!


Digg!

Tuesday, February 13, 2007

Creating Photoshop Copyright Brush

As many of you know, you can never be to careful with your photography work. Especially in the digital age it is all to easy for someone to "borrow" your image with out your permission. So putting a copyright on your image is a great idea, and is easy if you make a custom brush to do it. It's like have a stamp with your copyright on it.
looks something like this "© Sam Lamp"
But typing it out each time and selecting the font can be tedious. Now you can do this in Photoshop CS, CS2 and Elements 4.
Will start with
Photoshop CS2
1. Open a new image by going to File> New. Any size will do, as long as it’s not tiny. Then choose the Type tool from the tool bar or get it by typing T on your keyboard. Click on your image to start typing (this will automatically put your text on a new layer).

2. To make the © using a PC, hold down the Alt key and type 0169. On a Mac, press Option + G. Then type in a copyright notice (your name, your company, etc.) as you want it to appear. Pick a font you like -- you’ll be stuck with it.

3. Now hide the Background layer. Do this by clicking the eye icon to the left of its name. Make sure your Type layer is still selected (click on it if not). Then select your text: Go to Select > Color Range, move the Fuzziness slider all the way to 200, and click OK.

4. Then make your custom brush: Choose Edit > Define Brush Preset. Enter a descriptive name for the brush (like MyCopyright), and click OK.

5. To use your new brush, select it. Grab the Brush tool (type B). Then, from the Options bar at the top of your screen, pull down the Brush menu and scroll to the bottom. Select the one you made, and stamp your copyright anywhere you want.

Photoshop CS

1. Open a new image by going to File> New. Any size will do, as long as it's not tiny. The background contents should be the default, white. Click OK. Set your colors to the default (black in the foreground, white in the background) by typing D on your keyboard. Then choose the Type tool from the tool bar or get it by typing T on your keyboard. Click on your image to start typing (this will automatically put your text on a new layer).

2. To make the © using a PC, hold down the Alt key and type 0169. On a Mac, press Option + G. Then type in a copyright notice (your name, your company, etc.) as you want it to appear. Pick a font you like -- you'll be stuck with it.

3. Now hide the Background layer. Do this by clicking the eye icon to the left of the Background layer's name on the Layers Palette. Make sure your Type layer is still selected (click on it if not). Then select your text: Go to Select > Color Range, move the Fuzziness slider all the way to 200, and click OK.

4. Then make your custom brush: Choose Edit > Define Brush Preset. Enter a descriptive name for the brush (like MyCopyright), and click OK.

5. To test your new brush, open an image you'd like to stamp. Grab the Brush tool (type B). Then, from the Options bar at the top of your screen, pull down the Brush menu and scroll to the bottom. The one you just made is the last on your list. Click on it to select it, then click the spot in your image where you want to stamp your copyright. If it's too small to see, increase your brush size.

Element 4

1. Open a new image by going to File> New Blank File. Choose the Preset Default Photoshop Elements Size. The background contents should also be the default, white. Click OK. Set your colors to the default (black in the foreground, white in the background) by typing D on your keyboard. Then choose the Type tool from the tool bar or get it by typing T on your keyboard. Click on your image to start typing.

2. To make the © using a PC, hold down the Alt key and type 0169. On a Mac, press Option + G. Then type in a copyright notice (your name, your company, etc.) as you want it to appear. Pick a font you like -- you'll be stuck with it.

3. Click anywhere on your image (other than on the type, that is) to get out of typing mode.

4. Then make your custom brush: Choose Edit > Define Brush. Enter a descriptive name for the brush (like MyCopyright), and click OK.

5. From the Options bar at the top of your screen, pull down the Brush menu (it's the down arrow next to the wavy line that shows what kind of brush you're currently using) and scroll to the bottom. The copyright brush you just made is the last on your list. Click on it to select it.

6. To test your new brush, open an image you'd like to stamp. Grab the Brush tool (type B). then click the spot in your image where you want to stamp your copyright. If it's too small to see, increase your brush size.

Directions are compliments of Popphoto a great resource for any photographer.


Digg!

Monday, February 12, 2007

Way to cold!

Well I managed to get out and get some pictures today. Let me just tell you wind chill factor is everything! I wasn't outside 10 minutes before I felt like I was a Popsicle.
I did get some neat shot of some waterfalls I have been to before. The ice and snow really changed the whole scene. So I took the pictures and processed them into HDR. Such a cool picture, then I created another one of those Out of Bounds photos from it.

Such a cool technique. I did find that I had to go back to the directions several times.
So it's a good idea to to either bookmark or keep a file of the directions as I know you will need them.

I am trying to get some pictures of smoke so I can do some of those amazing smoke pictures. But I haven't got it figured out yet. So if anyone has any tips or pointers I am all ears.
I have tried a small aperture and a slow shutter but all I get is a fuzzy picture.

I did come across a set of directions on how to use photoshop to make a gradient ND filter effect. Now I haven't tried it yet, but I am going to post it and then give it a try tomorrow.
So here it is. If someone does try it, please let me know how it works and send pictures and I'll post them here.

1) Open the photo you would like to use this on.

2) Press D to set your foreground color to black

3) Create a new gradient adjustment layer in the layers palette (looks like a B&W cookie)

4) Choose the Foreground Color -> Transparent gradient

5) Click the check box on the bottom that says "reverse"

6) Using the Layers palette change the blend mode to "Overlay" (this is from the drop down box that normally says "Normal")

7) Adjust the layer opacity to make the sky look natural.

You can now double click to thumbnail for the gradient and use the slider arrows to adjust how far in to the image the gradient goes.
This site is all about learning either from me to you or you to me. So don't be afraid to speak up if you have a tip.


Digg!

Friday, February 09, 2007

Photoshop Tutorial Videos - FREE!

Well for those of you who know me well the word "free" to me is great! I believe there is nothing you can't learn on the internet for free. Just yesterday I needed to learn how to bleed the radiators in my new place. So I went to google and voila I found a quick how to and fixed the noisiest radiators in town!
So I am always on a quests for new information that is free on how to do lots of things pertaining to photography.
Photoshop is such a great program and I have barely scratched the surface of it's many uses.
Well I found this cool site called Oman3D. This site offers FREE photoshop video tutorials on a number of things you can do in photoshop.
The videos are well presented and they have clear instructions that make this a must visit for any beginner.
The one I found really fun was how to replace a sky in your image. Here are my results from that tutorial.

Think I did rather well. This tutorial has taught me so much more than adding or should I say replacing something in a photograph, not just the sky. The techniques I learned are boundless in there uses.


Digg!

Thursday, February 08, 2007

Enhancing Pictures Using Photoshop


I found this video that shows you the steps on enhancing photographs. It's about 12 minutes and it shows some pretty easy things you can do to fix such things as shadows on a face and wrinkles.
Well worth a few minutes, even if you don't have photoshop you can apply some of these same techniques in many other programs.
I would love to see some before and after shots.

I think I am having with drawls! I haven't gone out an taken any photographs in weeks. The weather is so brutally cold I am afraid my camera might crack! LOL
And taking pictures inside seems a bit silly since the place looks like word war III start here.


Digg!

Wednesday, February 07, 2007

All About Aperture

Well since the northeast has been hit by an arctic clipper going out to take pictures is out. And since I moved my house is still in disarray taking pictures is out also. So I have been crusing the web reading little articles here and there on photography.
I stopped my Youtube and found some pretty interesting videos on photography.
This one is about the basics of the aperture and how it works.
I found it informative so I thought I would post it for everyone to check out.


Digg!

Sunday, February 04, 2007

Flickr Backup

Well I am finally getting back on track. Moving is such a pain, but it did make me think about the things I save and why I have become such a pack rat! But I decided being a pack rat isn't all that bad, except I can never find anything! Including backups of photographs. Thats one of the reasons I use Flickr. My account is coming up for renewal this month and I was wondering what would happen to all my photographs that I have posted there.
What if I didn't renew? Would they just toss my photographs and be done with it. What if I wanted to save all of those pictures? Would I have to download each photograph individually or can I download them in one shot?
Because if I had to do that one picture at a time I would NOT be happy. I have close to 1200 pictures!
Well I came across a program that is called Flickr Backup. It requires you to give the program permission to "write" to your account. Which allows for the download of pictures. Just sign in and then it downloads a thumbnail of each of your pictures. Then you can select which photos you want to download.
It allows you to not only save it to your hard drive but you can also select which program you use to write your dvd's or cd's and it will automatically download and write it to disk.
For 1147 photos it took about 20 minutes to download with a dsl connection.
This is something everyone should do. Don't just rely on Flickr to archive your photographs because you just never know. You should always have at least 2 backups of all important pictures, documents and whatever else you need to save. One should be kept in some place other than your home, like at work or in storage.
So if you have photos on Flickr this is something you should really.

Thursday, February 01, 2007

Well I Finally Did it!

Yes, I am back. I managed to move an entire house full of stuff 2 miles down the road in under 5 days! I hate moving!! If I ever have to move again it will be when I win the lottery so I can hire someone to do it for me! LOL
I actually did find a few minutes this week to spend with my camera.

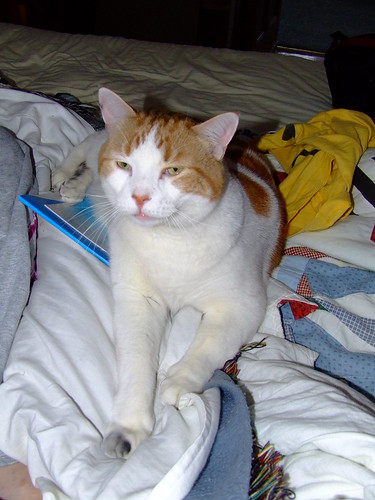
For those of you that don't know I have 7 cats. Yes, you read right 7. No I don't know why I ended up with 7 it just happened.
The picture you see there is "Cheddar Cheese" You'll notice his front paw is black. Yes, he is a dirty dirty boy. The day after we moved in he discovered an unusable fireplace that hasn't been cleaned apparently. The old tenants put some logs in there for looks and I guess Cheddar got on the log and stuck his head up in the flew! We heard something fall and went into the living room and there was the log on the floor. I looked around and saw Cheddar covered in soot!
He will have to clean himself because he isn't getting a bath by me! LOL
Everyone has a moving story and that's mine.
I do want to say thank you for all the comments about my new blog I am really enjoying it and I hope everyone is too.
I should be getting back into the swing of things this weekend. I have several things I want to share so stay tuned for more.